|
|
Frequently Asked Questions
I decided to create a frequently asked questions page because more and more I am being asked certain questions about my website. As time goes by I will try and add the most common of them to this page.
- Do you need a bike for the Suncoaster Trail?
Phase one of the Suncoaster Trail (which is all that is complete right now) is 37 kms long and runs from Egmont Road and Hwy. 101 junction to Homesite Forest Service Road in Halfmoon Bay. You don't need a bike for the trail, but if you wanted to do the whole thing in a day it would help. Most people I know do a section of it in a day rather than the whole thing. Check out this page and scroll to the bottom to see more information on the four sections. Having said that, I think the whole trail would make an awesome cross-country run for those in training for races, etc. Just as a caution, runners, hikers and bikers need to be aware of the loose rocks that have been used as base for the trail on some sections. They can be very awkward and slippery.
- What are the directions to get to the new bridge over Chapman Creek
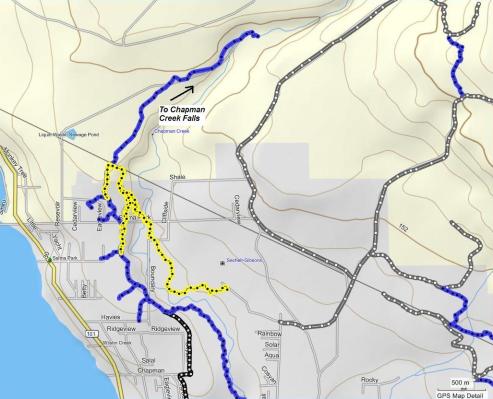
Here is the easiest way to get to the new bridge. Once you've done it from this direction you will be able to figure out access from the Davis Bay/Selma Park trails: - Head up Field Rd. and turn left at the top to head down to the airport.
- Follow the road to the end where there is a big open field where you can park.
- You will see a fence that runs along the south side (left as you are coming down the road). Follow this back a little ways until you get to the gate.
- Go through the gate and the trail starts out following along the fence and then cuts into the bush. Just keep following it til you get to the bridge.
- Once you cross the bridge, follow the trail for about five minutes (keep left) and you will connect with the existing Chapman Falls trail network. Up there you can go right or left depending on where you want to end up.
Here's a map that shows you the area. The yellow is the new trail plus some overlap of trails on the existing trail network.

- How do I add a Google Earth KML Viewer gadget to my own website?
First you will need to download Google Earth onto your computer. - Go to google.ca or google.com by typing the address into the address bar in Internet Explorer or Firefox.
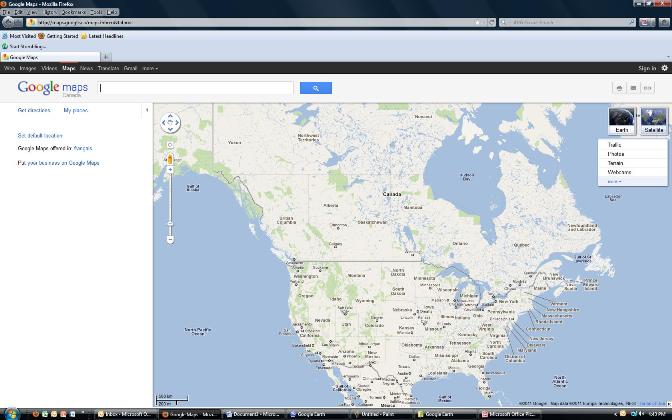
- Click on Maps along the top lefthand side of the Google window.
- Point at the Satellite icon at the top righthand side of the Google Map screen. Click on the Google Earth icon that pops up to the left.
- Follow the steps to download Google Earth to your computer.

Once Google Earth is downloaded to your computer you will need to open it and add tracks from either your GPS or your computer. - Start Google Earth. It will likely be on your Start button menu or in Programs if you are using a PC. Not sure where programs go if you are using a Mac.
- If you are taking a track from your GPS make sure that you have your GPS plugged into your computer and turned on as the program will need to look for and find your GPS to be able to download the tracks.
- Click Tools on the Menu bar and GPS on the drop down menu. Whatever tracks you have on your GPS will be shown on the Google Earth map.
- If you are using a track that has been downloaded from your GPS to your computer, then click File, Open and then Browse to find the downloaded GPS track. The GPS files off my Garmin have a .gbd extension. You will likely need to click on the down arrow beside where it says Google Earth (*.kml *.kmz) which is just to the right of the Filename text field and then choose Gps. When you do that you will see all of the compatible GPS extensions that work in Google Earth.
- Find your file, click on it and then click the Open button. A Google Earth – GPS Data Import box will open and you just need to click OK. I don’t make any changes and leave the two boxes ticked.
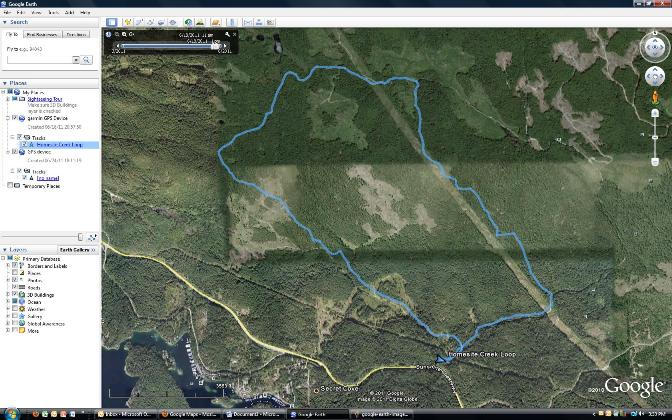
- Once you have successfully found and added the track to Google Earth it will show you the track on the map and an item will show up called GPS device under Temporary Places in the left pane of the window.

- If you wish to make changes to the way the track displays on the map, click Edit, Properties. A dialogue box will open. There are four tabs and it will likely default to view the Description tab. You can change the name of your track here.
- Click on Style, colour to change the colour of the track on the map. Under Lines, click on the colour box and a palette of colours will appear. Click on the one you want.
- You can also change the width of the line here. It defaults to 6 and you can play around with different numbers to see what suits you.
- When you are satisfied with your choices click OK to apply them.
Note: You may have noticed when you clicked Edit on the Menu bar that the item above Properties is Show Elevation Profile. This is a nice feature that allows you to graphically show the elevations gains and losses over the course of your track. If you click on it, the Profile will show up under the map. This feature does not transfer to the KML gadget. - Okay, once you are satisfied with your map you can save it by clicking on File, then point to Save, and choose Save Place As... In the dialogue box that opens make sure you change the location to an appropriate one and give the track a good name that will make sense to you. It should also be all lower case with no spaces i.e. either my-track or mytrack. It will be given a .kmz extension so it will become either my-track.kmz or mytrack.kmz. Web browsers do not like spaces in filenames.
- Once your file is saved to your computer, you will need to upload it to either an online storage area (I just use my storage space at Eastlink where I get my Internet through) or to the server where your website is located. I use an FTP program called FileZilla to do this. If you don’t have an FTP program, you can download a free version of FileZilla and choose the Client version.
Here are the instructions for getting the code to embed your KML Viewer gadget on your website: - Go to this page and then add it to your Bookmarks or Favourites so you can get here quickly in future.
- If it tells you there was a problem loading the Google Earth Plug-in just reload the page and this usually fixes the problem.
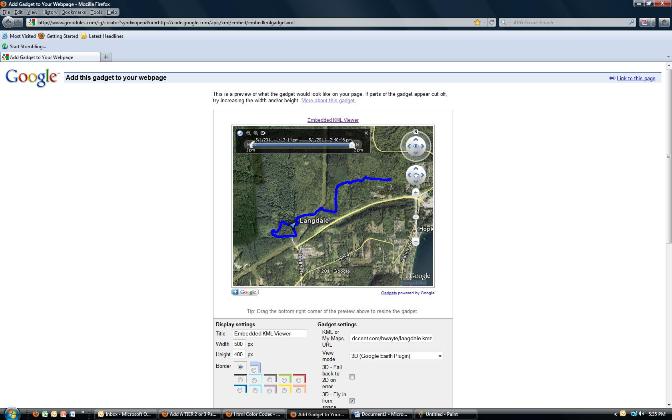
- In the field under Gadget settings and to the right of KML or My Maps URL type in the address where your uploaded kmz file is located. For example, if your file is sitting on your Cable provider’s webspace, the address might look something like this - http://www.user.eastlink.ca/msmith/langdale.kmz. Once it is typed in just hit the Enter key on your keyboard or click on the Preview Changes button at the bottom of the window.

- The track should show up in the Embedded KML Viewer window. You can resize the viewer and add a coloured border if you wish. Once it is the way you want it to look on your website, then click on the Get the Code button at the bottom of the page.
- The code will show up in a field under a label that says: Copy and paste the HTML below to include this gadget on your webpage. You should do just that – select the code by clicking and dragging over it until it is all selected, then use your keyboard to copy by holding down the Ctrl key and without letting up on the Ctrl key tap the C on the keyboard (the keyboard command for paste is Ctrl + V). This copies the code to your computer Clipboard where it will sit waiting for you to paste it somewhere.
- Now all that’s left to do is paste the code into a webpage in between Body tags. I am not going to tell you the steps to do this because if you already have a website you will know what to do at this point. If you have done everything correctly, you should be able to view your webpage and see the Google Earth KML Viewer appear on the page.
Note: Viewers of your website will need to download Google Earth on their own computers to see the Viewer, but will be given the opportunity to do so when the KML Viewer tries to load.
If you find this page useful, please click on the Share this page on Facebook button below.
Click here to return from Frequently Asked Questions to the Home page.
Enjoy this page? Would you like to link to it? Here's how:
Would you prefer to share this page with others by linking to it?
- Click on the HTML link code below.
- Copy and paste it, adding a note of your own, into your blog, a Web page, forums, a blog comment,
your Facebook account, or anywhere that someone would find this page valuable.
|
|
|


